
Embroidered Hats for Every Occasion
Understanding Different Hat Shapes
Cold Weather Hats
Embroidered hats designed for cold weather, the placement and size of the embroidery can vary significantly. This variation largely depends on whether the hat has a cuff and the size of that cuff. For instance, a beanie with a large cuff offers more space for embroidery, allowing for larger and more intricate designs. Conversely, a hat without a cuff or with a smaller cuff will limit the embroidery area, necessitating smaller and simpler designs. This flexibility ensures that the embroidery complements the hat’s style and functionality, providing both warmth and aesthetic appeal.

Military Caps
Military caps, often known for their structured and utilitarian design, follow similar embroidery location requirements as traditional ball caps. However, due to the unique shape and structure of military caps, the height of the front panel can sometimes necessitate smaller decorations. For example, a cap with a shorter front panel may require a more compact design to ensure that the embroidery fits well and looks proportionate. This attention to detail ensures that the embroidered hat maintains its sleek and professional appearance, suitable for both casual wear and formal military settings.
Straw Hats
Straw hats, popular for their lightweight and breathable qualities, also adhere to the same decoration size and placement guidelines as baseball caps. However, when it comes to embroidering on the fabric band of a straw hat, specific dimensions must be followed. The standard dimensions for embroidery on a straw hat’s fabric band are 1″H x 4.5″W. This precise measurement ensures that the embroidery is well-positioned and enhances the hat’s overall aesthetic without overwhelming its delicate structure. Whether for a casual day out or a stylish summer event, an embroidered hat like a straw hat can add a touch of elegance and personalization.
Visors
Visors, known for their open-top design and sun-shielding capabilities, have specific dimensions for embroidery as well. The standard size for embroidery on visors is 1″H x 4.5″W, and the embroidery is typically placed only on the front. This placement ensures that the design is prominently displayed while maintaining the visor’s functional aspects. The limited embroidery area requires careful consideration of the design to ensure it is both impactful and visually appealing. An embroidered hat in the form of a visor can be a stylish and practical accessory for outdoor activities, providing both sun protection and a personalized touch.
Embroidery Techniques and Tools
Embroidery Methods
Embroidery is a versatile decoration technique that uses a needle and thread to create intricate words or images on various products, including hats. This method can be executed either by hand or with the help of a machine. Hand embroidery allows for a high level of detail and customization, making each piece unique. On the other hand, machine embroidery, especially with machines equipped with multiple needles, offers efficiency and consistency. Each needle on these machines holds a different thread color, allowing for complex, multi-colored designs without the need to stop and rethread the machine. This capability makes machine embroidery a popular choice for producing high-quality embroidered hats in larger quantities.
Embroidery Hoop
An essential tool in the embroidery process is the embroidery hoop, which holds the fabric securely in place during decoration. Hoops come in various sizes to accommodate different design requirements and fabric types. However, not all embroidery machines can accommodate every hoop size. The choice of hoop size can impact the final design, as a well-fitted hoop ensures that the fabric remains taut and stable, resulting in precise and clean embroidery. For embroidered hats, selecting the appropriate hoop size is crucial to achieving a professional and polished look, whether the embroidery is done by hand or machine.
By understanding these different hat shapes and the specific requirements for embroidery, you can create customized and stylish embroidered hats that cater to various needs and preferences. Whether it’s a cozy beanie for winter, a structured military cap, a breezy straw hat, or a practical visor, the right embroidery techniques and tools can enhance the appeal and functionality of each hat.
Domestic vs. Overseas Embroidery
Local Embroidery
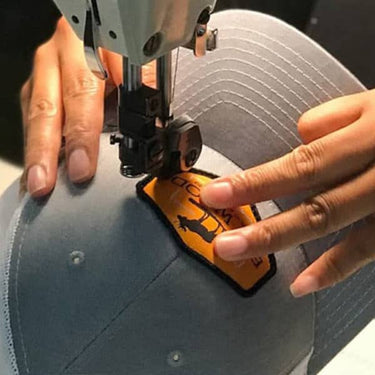
When it comes to embroidered hats, local embroidery is often limited to two primary techniques: flat stitch and 3D stitch. These methods are straightforward but come with certain constraints. For instance, the decoration size and location are more stringent. This is because the embroidery must be done on a completed, round cap, which limits the flexibility in design placement. Despite these limitations, local embroidery is a popular choice for its quick turnaround times and the ability to oversee the quality closely.
International Embroidery
On the other hand, international embroidery offers a broader range of possibilities. One significant advantage is the ability to embroider individual panels before the hat is assembled. This allows for more creative freedom in terms of decoration placement and size. Additionally, overseas facilities can execute a wider variety of stitch types, making the designs more intricate and unique. Here are some of the stitch types available:
- Applique Embroidery
- Asynchronous Stitch
- Bamboo Pattern
- Broken Stitch
- Chain Stitch
- Chenille Embroidery
- Circle Stitch
- Cloudy Stitch
- Cross Pattern
- Dot Stitch
- Edging Embroidery
- Flannel Embroidery
- Foam Stitch
- Gradient Embroidery
- Grain Stitch
- Hairy Embroidery
- Herringbone Pattern
- Intertexture
- Irregular Stitch
- Mesh Stitch
- Net Pattern
- Pattern Fill Stitch
- Plaid Stitch
- Rhinestone Embroidery
- Saw Tooth Stitch
- Sequins Embroidery
- Shaved Flat Stitch
- Snow Stitch
- Stone Stitch
- Threadless Stitch
- Weaving Pattern
- Wheat Stitch
- Yarn Embroidery
- Zig Zag Stitch
These diverse techniques allow for more personalized and detailed designs, making international embroidery a preferred choice for those looking to create unique and high-quality embroidered hats.
The Process of Digitizing Designs
Converting Graphics
Digitizing is a crucial step in the embroidery process. It involves converting a design or logo into a stitch file that the embroidery machine can read. This transformation turns a flat graphic or photo into a stitch image, guiding the needles on how to move to recreate the design. One must consider the hoop requirements during this process. If the design is too large to fit within the hoop, it needs to be broken down into smaller sections. This means the machine has to be stopped and the fabric re-hooped between sections, which can be time-consuming but ensures the design is accurately reproduced.

Stitch Count and Its Impact
Stitch Density
Stitch count refers to the number of stitches used to recreate a design. A higher stitch count means a more detailed and dense design, but it also results in longer production times and higher costs. Less dense designs, which use fewer stitches, are cheaper and quicker to produce. However, they may show the fabric beneath the stitches. Dense designs, on the other hand, have shorter, thicker stitches that are closely packed together, making them more expensive but also more visually striking.
In summary, the choice between local and international embroidery, the digitizing process, and the stitch count all play crucial roles in the creation of high-quality embroidered hats. By understanding these factors, you can make informed decisions to achieve the best possible results for your custom headwear.