
Unlock the Magic of Custom Embroidery Hats
Introduction
Embroidery as an art form has been around for centuries. In the past, skilled artisans created intricate designs by hand using just a needle and thread. Today, technology has advanced to the point where embroidery can be done quickly and efficiently using programmable machines. Over the last few decades, digital embroidery has emerged as a popular way to personalize clothing, accessories, and, of course, to customize hats. In this post, we'll take a deeper look into the process we employ at TopCustomHats.
| Step | Description |
|---|---|
| Digitization | Converting a design into a digital file that can be read by an embroidery machine. |
| Color Selection | Choosing from 100 thread colors and setting up the embroidery machine with the correct colors. |
| Framing Material | Securing the hat in a frame to hold it in place during the embroidery process. |
| Stitching | The machine reads the digital file and stitches the design onto the hat using needles and thread. |

Digitize Those Logos
The first step in custom embroidery hats is called digitization. This is the process of converting a design or logo into a digital file that can be read by an embroidery machine. Our embroidery technicians use specialized embroidery software to re-create the design stitch by stitch and color by color. This step is crucial, as it determines whether or not a design is accurately reproduced by the embroidery machine on the final product.
To properly re-create your design, our technicians choose from a wide variety of thread colors and different types of stitches, such as satin, chain, and cross-stitch. The digitized file is then outputted as a machine file, ready for the next step.
Color Selection and Setup
Once the digitization process is complete, the embroidery machine needs to be set up. In this step, we load the digitized file into the machine’s on-board computer. From there, we make sure that all of the correct colors are loaded on the machine. Most modern embroidery machines can handle between 9 and 15 colors at a time, which is more than enough for most designs. Colors are matched from a palette of 100 different threads by our technicians.
Framing the Material
Once the design for your custom hat and the correct colors are loaded onto the machine, the next step is to frame the hat so that it can be loaded onto the digital embroidery machine. The frame is essentially a hoop that holds the hat securely in place while the embroidery is being done. Cap frames are a heavy-duty piece of equipment usually made of stainless steel and come in various sizes to accommodate different types of hats. Flat frames made out of strong plastics are also used for beanies and other garments that need to be loaded horizontally in the embroidery machines.
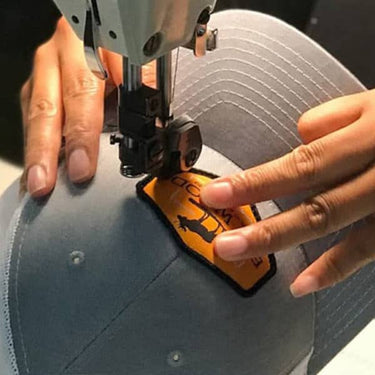
Stitch Away
After the framing process is complete, the hat is loaded into the embroidery machine. The machine then reads the instructions in the digitized file to stitch the design using a series of needles and thread. This is where the magic happens, transforming a simple hat into a personalized piece of art.
Embroidery is an art form that has been evolving for centuries, and it is the magic that makes custom hats possible. To see more examples and inspiration for your own personalized hats, check out our Instagram or TikTok, and if you need some help, drop us a line.