
Nail 3D Puff Embroidery with Custom Hats
Understanding 3D Puff Embroidery
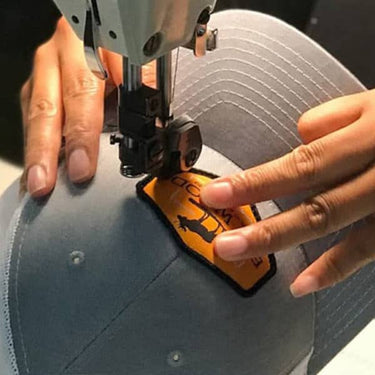
The Art of 3D Puff Embroidery on Custom Embroidered Hats
3D puff embroidery is a craft that requires significant effort and practice. Unlike simple designs, 3D puff embroidery adds depth and dimension to the artwork, making it more visually appealing. This technique is particularly popular for custom embroidered hats, where the raised designs stand out prominently.

Creating custom 3D puff designs can be costly. The price varies based on factors such as quantity, material, and the complexity of the design. In today’s digital age, the process can be executed manually or with the help of computer software and embroidery machines. While manual embroidery demands more time and skill, using machines can streamline the process and ensure consistency.
The demand for 3D designs, especially on hats, has been growing steadily. This trend is driven by the unique and eye-catching appearance of 3D puff embroidery. Mastering the skill of 3D puff embroidery digitizing can offer significant competitive advantages. It allows you to create intricate and detailed designs that set your products apart from the competition, especially when producing custom embroidered hats.
| Factor | Importance | Tips |
|---|---|---|
| Foam Selection | Impacts design height and machine operation | Balance thickness and machine capability |
| Fabric Choice | Affects stitch density and design stability | Use thick, stable fabrics; avoid noble fabrics |
| Machine Speed | Determines design precision and quality | Experiment to find optimal speed; slow down for intricate patterns |
| Needle Selection | Ensures clean and precise stitches | Use sharp needles |
| Stitch Density | Enhances 3D effect | Keep higher than normal flat designs |
| Test Runs | Helps avoid mishaps and ensures quality | Conduct before final product |
Selecting the Right Foam
Choosing the right foam is crucial for achieving the desired model height in 3D puff embroidery. The thickness of the foam directly impacts the prominence of the design. Thicker foams create more pronounced designs, but they can also interfere with the smooth operation of the embroidery machine. Therefore, it’s essential to find a balance between the desired design height and the machine’s capability to handle the foam.
Importance of Fabric Choice
The choice of fabric plays a vital role in the success of 3D puff embroidery. For optimal results, use prone and slippery fabrics that can handle the higher stitch density required for 3D designs. Thick, stable fabrics, such as those used in caps, are preferred because they provide a solid base for the embroidery. This is particularly important when creating custom embroidered hats.
Avoid using noble fabrics like towels, as their inherent loft can diminish the 3D effect. The fabric’s stability ensures that the foam stays in place and the design maintains its raised appearance.
Adjusting Machine Speed
Achieving the best results in 3D puff embroidery requires careful adjustment of the embroidery machine’s speed. The ideal speed is crucial for creating clean and precise designs. Conducting experiments to determine the best speed for different orders can help you find the optimal settings for your machine.
Slowing down the machine speed can improve the quality of the embroidered designs, especially when working with thicker foams or more intricate patterns. By fine-tuning the machine speed, you can ensure that the stitches are tight and the foam remains securely in place.
In summary, mastering 3D puff embroidery involves understanding the intricacies of foam selection, fabric choice, and machine speed adjustment. By paying attention to these details, you can create stunning and durable custom embroidered hats that stand out in the market. Whether you are looking to embroider hats for a sports team, a corporate event, or a fashion line, the quality and uniqueness of your embroidered custom hats will make a lasting impression.
Needle Selection for Custom Embroidered Hats with 3D Puff Embroidery
When working on custom embroidered hats with 3D puff designs, selecting the right needle is crucial. Sharp needles are highly recommended because they can easily perforate through the foam used in 3D models. This ensures that the stitches are clean and precise, which is essential for achieving a professional look. Using a dull needle can result in uneven stitches and may even damage the fabric or foam.
Creating and Stabilizing the Outline
Before you start to embroider hats with satin stitches, it’s important to create a design outline. This outline serves to stabilize the area and counteract the volatility of the foam. By doing this, you ensure that the foam stays in place and doesn’t shift during the embroidery process. This step is particularly important for maintaining the integrity of the design, especially when working with intricate patterns.
| Step | Description | Tools/Materials Needed |
|---|---|---|
| Create Design Outline | Stabilizes area and foam | Embroidery software |
| Secure Foam | Keeps foam in place | Tape or sticking spray |
| Adjust Machine Speed | Ensures clean and precise designs | Embroidery machine |
| Remove Excess Foam | Cleans up the design | Heat gun, tweezers |
| Conduct Test Runs | Ensures quality and helps in training | Sample fabric, embroidery machine |
| Use Rubber Band Hack | Simplifies the process | Rubber band |
Securing the Foam
To keep the foam in position, you need to program machine stops after completing the flat design. This allows you to place the foam securely before continuing with the 3D puff embroidery. You can use tape or a sticking spray to hold the foam in place. This ensures that the foam doesn’t move, which is crucial for achieving a consistent and high-quality design.
Removing Excess Foam
Once the embroidery is complete, it’s time to remove the excess foam. This can be done using a heat gun or tweezers for small, hard-to-remove pieces. The heat gun helps to melt away any remaining foam, making it easier to remove. Tweezers can be used for more precise removal, ensuring that no small bits of foam are left behind. This step is essential for giving your custom embroidered hats a clean and polished look.
Enhancing Stitch Density
In 3D puff embroidery, it’s important to keep the stitch density higher than in normal flat designs. Increased stitch density enhances the 3D effect, making the design more pronounced and visually appealing. Most computerized embroidery machines allow you to adjust the stitch density, so take advantage of this feature to achieve the best results. Higher stitch density ensures that the foam is well-covered and the design stands out.
Conducting Test Runs
Before you start working on the final product, it’s a good idea to conduct test runs. This helps you avoid any mishaps and allows you to determine the best fabric and equipment for the job. Test runs also serve as valuable training for novice embroiderers, helping them understand what works and what doesn’t. By doing this, you can ensure that the final product meets your expectations and maintains a high level of quality.
Simple Hack for Hat Embroidery
Here’s a simple hack for making the process of 3D puff embroidery on hats easier. Use a rubber band to hold the puff in place during the sewing process. When your design is ready for the puff, place the puff in position and secure it with a rubber band. This keeps the puff from moving and makes the sewing process much smoother. Once the design is complete, you can remove the excess foam, leaving you with a clean and professional-looking hat.
By following these steps, you can master the art of 3D puff embroidery and create stunning custom embroidered hats that stand out. Whether you are working on embroidered baseball caps or other types of embroidered custom hats, these tips will help you achieve the best results.