
Top Tips for Perfect Custom Embroidered Patches
Introduction
Custom embroidered patches hats are a versatile way to add uniqueness and effective brand placement to garments and hats. These patches are commonly seen on uniforms, such as those worn by military personnel or sports teams. They not only serve as identifiers but also add a touch of personalization and pride. There are various methods to attach custom embroidered patches to different types of fabrics, each with its own set of advantages and considerations.

Reliable Attachment Methods
| Method | Advantages | Disadvantages | Best For |
|---|---|---|---|
| Hand Sewing | Precise, Durable | Time-consuming, Skill needed | High-quality finish |
| Sewing Machine | Quick, Strong | Less precise | General use |
| Embroidery Machine | High precision, Intricate designs | Requires machine, Costly | Professional finish |
| Glue | Simple, Quick | Temporary, Weakens after wash | Quick fixes |
| Heat Seal | Fast, Easy | Not for stretchy fabrics | Firm fabrics |
| Heat Seal + Sew | Durable, Secure | Requires both methods | Long-lasting attachment |
Sewing
Sewing is one of the most dependable methods for securing embroidered patches. It ensures that the patch remains firmly attached to the fabric, even after multiple washes.
Hand Sewing
Hand sewing requires skill and patience. This method involves stitching the patch onto the fabric manually, which can be time-consuming. However, the result is often more precise and durable. If you are not confident in your sewing skills, it is advisable to hire an expert. A professional can ensure that the patch is securely and neatly attached.
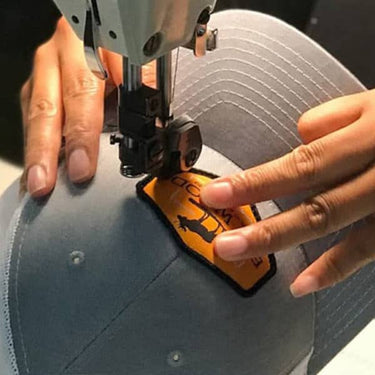
Sewing Machine
Using a sewing machine to attach patches is a quicker alternative to hand sewing. To do this effectively, pin the patch in place and use the machine at a low speed to follow the edges of the patch. This method is less labor-intensive and provides a strong attachment.
Embroidery Machine
An embroidery machine is a preferred technique for precision. These machines utilize software to create designs and can produce intricate patterns with ease. By uploading vector files, the machine can accurately stitch the patch onto the fabric, ensuring a high-quality finish.
Crafting Your Letterman Patch
Measure Dimensions
First, measure the length and width of the area on the hats where the patch will be sewn. This ensures that your patch will fit perfectly. Use a letter template for initials or school names, making sure the stencil’s measurements align with the jacket’s dimensions and your embroidery machine’s parameters.
Trace Outline
Next, trace the outline of your stencil on design paper or a drawing pad. Adjust the sizes using a ruler to ensure accuracy. You will need separate patterns for the top and bottom layers of the letters.
Create Initials
Creating initials or your school’s emblem is straightforward. Border the lower layer with a contrasting color and combine it with a textured top layer, such as chenille. Incorporate your school colors to make the patch more personalized.
Cut Out Designs
Label your fabric with tailor’s chalk to mark where the embroidery stitches will go. Choose thread colors that will complement the design. Use a cutting mat and rotary cutter to carve out the fabric’s upper layer, ensuring you do not cut through the inner layer.
Carve Out Fabric’s Upper Layer
Use a cutting mat to protect your work surface while you carve out the fabric’s upper layer with a rotary cutter. This step is crucial for preparing the fabric for embroidery.
Embroidery Techniques
Stabilize the Patch
To keep the patch steady during embroidery, apply a thin coat of temporary glue to the upper letter and attach it to the lower layer. Alternatively, use a sticky preservative that matches your fabric’s weight to stabilize the patch.
Fasten Inner Layer’s Fabric
Bind the bottom layer’s fabric to the embroidery machine’s hoop. Ensure the fabric is taut and the outer layer letter is centered to prevent shifting during stitching.
Embroider the Letter
Use a close-fitting stitch to embroider the upper layer, which will provide the best results. After finishing the border, cut any loose threads. Then, embroider the external layer with a tight stitch to surround the border, and remove any loose threads.
Quick and Easy Solutions
Glue
Glue is a simple but temporary method for attaching embroidered patches. This technique involves applying glue to the back of the patch and pressing it firmly onto the garment. Hold it in place for about 30 seconds to ensure it adheres properly. However, this method is not suitable for all materials and may weaken after washing. It is best used as a quick-fix solution rather than a permanent attachment.
Heat Seal Backing
Heat seal backing is a popular choice for its speed and ease of use. This method is ideal for firm fabrics but not recommended for stretchy or heat-sensitive materials.
Steps to Attach
- Preheat the Garment: Set your iron or heat press to a temperature between 325-400 degrees, depending on the fabric type.
- Place the Patch: Position the patch on the preheated garment.
- Heat-Press: Apply medium pressure with the heat press for 15-20 seconds. For added security, you can flip the garment and apply heat to the reverse side as well.
- Ensure Stability: Make sure the patch remains in place until the glue hardens. Avoid moving the patch during this time to ensure a secure bond.
- Cool Down: Allow the garment to cool down completely before handling it.
By following these steps, you can achieve a quick and durable attachment for your embroidered patches.
Combining Methods for Durability
Heat Seal and Sew: The Best Approach for Long-Lasting Attachment
When it comes to ensuring the durability of embroidered patches, combining heat sealing and sewing is the most effective method. This approach leverages the quick application of heat sealing with the reliability of sewing, providing a robust solution that keeps patches secure and maintains their shape even after multiple washes.
- Heat Sealing: Start by preheating your garment to a temperature between 325-400 degrees Fahrenheit. Place the patch on the preheated garment and apply medium pressure with a heat press for 15-20 seconds. This step ensures that the glue on the patch adheres firmly to the fabric.
- Sewing: Once the patch is heat-sealed, sew around the edges to reinforce the attachment. This dual method ensures that the patch remains in place and withstands the rigors of regular use and washing.
By combining these two methods, you achieve a balance of speed and durability, making it the best approach for long-lasting attachment of embroidered patches.
Creative Embroidery Techniques
| Advantage | Description |
|---|---|
| Competitive Pricing | Affordable customization |
| High-Quality Materials | Durable, Premium look |
| Fast Delivery | Quick processing, Worldwide shipping |
| Customer-Focused Approach | 100% customization options |
| Low Minimum Order Quantities | Flexible order sizes |
Applique Embroidery Sewing
Applique embroidery sewing involves attaching a fabric design onto another fabric base, creating a decorative and functional element. This technique is often used to cover fabric damage or add a unique design to garments.
- Standard Applique: In this method, a piece of fabric is sewn onto the base fabric, creating a layered effect. This can be used to hide stains, rips, or other imperfections while adding a decorative touch.
- Reverse Applique: This technique involves sewing a piece of fabric on the back of the garment and then cutting the front fabric to reveal the underlying design. This method is particularly popular among younger audiences for its stylish and funky look.
Both techniques offer creative ways to enhance the appearance of garments and hats with embroidered patches.
Popularity and Trends
Embroidered patches have become a fashionable choice for both hats and garments. They offer a unique way to personalize and enhance the look of various items.
- Side Patch-Fitted Hats: These hats feature patches on the sides, adding a distinctive and trendy element. They are particularly popular among fashion-forward individuals.
- Pocket Patches: Adding patches to the pockets of garments is another trendy option. This placement not only adds a decorative touch but also provides a unique way to personalize clothing.
Custom patches allow individuals to express their style and make their garments and hats stand out.
Advantages of Custom Patches
Custom patches offer several advantages, making them a preferred choice for many.
- Competitive Pricing: In-house customization allows for competitive pricing, making custom patches affordable for various needs.
- High-Quality Materials and Production Standards: Custom patches are made with high-quality materials and adhere to strict production standards, ensuring durability and a premium look.
- Fast Delivery and Worldwide Shipping: Orders are processed quickly, and worldwide shipping options are available, ensuring timely delivery.
- Customer-Focused Approach: Custom patches offer 100% customization options, allowing customers to choose materials, shapes, sizes, and colors according to their preferences.
- Low Minimum Order Quantities: Customers can order as few or as many patches as they need, thanks to low minimum order quantities.
These advantages make custom patches a versatile and attractive option for personal and professional use.
FAQs
Best Fabric for Patches
Cotton fabric is the best choice for embroidering patches. It provides a clean look and is easy to attach to hats and garments.
Type of Embroidery for Hats
Flat embroidery is considered the best type for hats. It allows for variations and complex lettering, making it ideal for detailed designs.
Best Way to Attach Patches
Combining glue and sewing is the best way to attach patches for maximum durability. This method ensures that the patch remains secure and withstands multiple washes.
Material for Hat Patches
100% woven cotton is typically used for hat patches. However, other materials can also be used based on specific requirements.
Optimal Embroidery Size for Hats
The standard size for hat embroidery is 120.65 mm x 54.61 mm (4.75"x2.15") . This size provides a balanced and aesthetically pleasing look on hats and beanies.
By understanding these methods and techniques, you can effectively use embroidered patches to enhance the appearance and durability of your garments and hats.